Don't forget to Pin It!

facebook

Thursday, October 31, 2013

Vegetable Tortellini Soup


This recipe was also mentioned in my first eMeals post. All these good foods, you'd think I would've made something good for tonight's dinner. Nope, sorry. I made chicken and mushroom soup rice. That took an hour and a half. And I'm not even sure it was cooked all the way. The texture was a bit off. So since I didn't even eat that, I felt like I should post a meal that is actually good. With this cooler fall weather settling in, everyone needs a good soup recipe, or two.

Vegetable Tortellini Soup


Prep: 15 minutes    Cook: 40 minutes   Total: 55 minutes

Ingredients:

2 Cups chopped onion
1 tablespoon olive oil
2 cloves garlic, minced
6 (14.5 oz) cans beef broth
2 cans diced tomatoes, undrained
1 cup salsa
1 teaspoon dried basil leaves
2 zucchini/squash, diced
2 (9 oz) package cheese-filled tortellini
Grated Parmesan cheese

Directions:

Cook onion and garlic until tender in a large stockpot. Add broth, tomatoes, salsa and basil; bring to boil.
Reduce heat and cook 10 minutes.
Stir in zucchini and tortellini.
Cook for approximately 9 more minutes, until tortellini is tender.
Ladle soup into bowls and sprinkle with Parmesan cheese to taste.


This made a LOT. See how full it was in that pot? And that's a HUGE pot! We're big eaters around here, and after eating it for 2 days, there was still a lot to freeze.


I <3 eMeals

Wednesday, October 30, 2013

Smoked Brat Saute with Beef Rice

When I first mentioned eMeals to you all it was in this post. Here, I mentioned about this dish being our favorite, and it still holds true. So here's the recipe for you.

Smoked Brat Saute with Beef Rice


Prep: 25 min      Total Time: 25 min

Main Dish Ingredients

2 (14 oz) smoked brats, sliced
2 tablespoons butter
3 zucchini, sliced
2 tablespoons minced onion
1/4 teaspoon oregano
1/2 teaspoon garlic salt
2 large tomatoes


Main Dish Instructions

1. Saute brats in a large nonstick skillet.
2. Remove then add and melt butter.
3. Saute zucchini and spices.
4. Cook until zucchini is tender/crisp.
5. Return sausage to the skillet and heat all.
6. Add chopped tomatoes and serve. (I roasted my tomatoes. I like my vegetables dead.)

Side Dish Ingredients

1 to 2 boxes beef rice mix

Side Dish Instructions

Prepare rice while brats are browning. Serve brat mixture over the rice.

I believe we used 2 boxes. This made a ton of food and was the first meal we made with eMeals. It was wonderful. We ALL ate it up. And had seconds. I don't care for zucchini either, and this made it taste good.


SAVE TIME AND MONEY WITH EMEALS MEAL PLANS

Tuesday, October 29, 2013

Roasted Tomato and Feta Shrimp

So guess who's sick again? Yup... this girl.. and the little girls, too. Why doesn't Brian ever get sick? This one's a fun one, I think he's actually having a sore throat right now.

So this week, instead of figuring out something crafty and what-not, I'm gonna rest my brain a little and basically just post recipes for you guys. Remember, nothing I ever do is hard or expensive. So if I can do it, you can do it.

Tonight's dinner is once again brought to you by eMeals, where all the ingredients can be purchased at Aldis.

Roasted Tomato and Feta Shrimp with Garlic Couscous and Croissants


Doesn't that just sound amazing? You know you want to try this one!

Prep: 30 min    Cook: 30 min    Total: 1 hour...

It did NOT take me this long. I had pre-cooked, peeled, deveined shrimp.. I think it took me about 40 minutes total.

Main Dish Ingredients:
2 lb medium shrimp, peeled and deveined
2 large tomatoes, chopped
1 tablespoon minced garlic
2 tablespoons olive oil
1/2 teaspoon salt and pepper
1/2 cup chopped fresh parsley (I didn't use this)
2 tablespoons fresh lemon juice
2 oz crumbled feta cheese

Main Dish Instructions:
1. Preheat oven to 450 degrees (fahrenheit)
2. Thaw shrimp under running cold water.
3. Place shrimp in between layers of paper towels to drain and pat dry.
4. Place tomatoes, garlic, olive oil, salt and pepper in a 13x9 inch baking dish, tossing gently to coat.
5. Bake 15 minutes.
6. Stir in shrimp; bake 10 to 15 minutes, or just until shrimp turn pink.
7. toss with parsley and lemon juice.
8. Spoon feta over individual servings, if desired.

That's the eMeal directions. I threw the shrimp into a colander in the sink and let water run over it while I diced up the tomatoes and did all that stuff. Then I dried the shrimp off once the tomato stuff was in the oven. I like my veggies more roasted, so since I knew that my shrimp was pre-cooked and didn't need to be in as long, I cooked the tomatoes longer.

I also didn't measure out the lemon juice. I just rolled the lemon on the counter, cut in half, and held it cut side up and squeezed out all the juice right over the finished mixture. Did this for both halves. You roll it to get the juices loose, and hold it cut side up so the seeds don't fall out.

Side Dish Ingredients:
10 oz box garlic couscous
1 package mini croissants

Side Dish Instructions:
1. Prepare couscous per package directions (this takes a total of 10 minutes and you can make it in the microwave).
2. Serve with croissants.

I'm not kidding, those are the directions for the sides. Told you this was an easy dish. Makes a lot, too. Pumpkin liked everything except the shrimp. She even liked the feta and the tomatoes. Snowflake's a bit sicker than Pumpkin and is on a more BRAT+Cheese diet these days, but still ate her croissant and couscous. They had grapes with theirs, too. I thought it fit with the feta.

So that's that. We loved it, and it was really a quick meal if you multitask. We ate ours piled up and mixed together. If you plan to eat it that way, maybe double up on the couscous. The shrimp and tomato mixture was also good stuffed into the croissants like a sandwich.

This post is not paid for or asked to be written by or any of that other stuff by eMeals. We paid for it ourselves and genuinely like the meals we're making with it.

However, if you would like to try it for yourselves, please click the following link so I can get credit for referring you.

EMEALS EASY AND DELICIOUS DINNER RECIPES

Monday, October 28, 2013

Books Vs. Movies

Ok. Here's the deal. I'm reading "The Book Thief" by Markus Zusak. I'm not totally enthralled by the book, but the characters stick. And they stick hard. It's a slower read for me, but I can't get them out of my head.


And on that note, we took the girls to Barnes and Noble Friday to let Pumpkin pick out her birthday book. (She gets most of our gifts post birthday) On display, was "The Book Thief" with about 3 different covers.

Three.

For the same book.

Why is that necessary?

Oh, because they've turned it into a movie.

Why do they do this? I'm seriously confused as to why nearly every movie out there was once a book before. Is the film industry really that desperate? I enjoy using my imagination. I enjoy picturing the story; being apart of it. And I'll admit, most book to movies franchises I've taken apart of and handed over my money (ahem "Harry Potter" to name one).. but I want something original.

And even though I had no intentions of watching the film version of this book, unless it ends up on Netflix and I have nothing else to catch up on, I'm disappointed that now my version of Liesel doesn't look like the girl on the newest cover. Can they at least leave the covers alone?
(Picture from Amazon. Order the Kindle version here.)
I know I'm not the first to say any of this, and probably won't be the last. And as long as we all pay to see the movies in some form, they'll keep making them. But, seriously, leave the books alone for those of us that don't actually see every single movie that comes out.

Rant over.

What's your favorite or least favorite book-to-movie adaptation? Leave it in the comments so I can feel like I'm not alone here!

Friday, October 25, 2013

Hickory Nut Wreath

An old, good friend of mine posted pictures of this beautiful wreath she made, so I surprised her with a comment: "Guest post for blog?!" She said yes! This is her first time writing a blog post, and since I surprised her with it, she didn't really get a chance to take "professional" photos. But you want real anyways, right?

So, without further ado.. A Tutorial for a Hickory Nut Wreath by Paige


This past Sunday after church, we went to my husband’s parents house to help with some home improvement things. Well, if you have kids, you know they have to help (like the help I'm getting now from my youngest). My mother-in-law and my daughter started collecting all the hickory nuts in the yard as busy work, and they separated the outer shells from the nuts.

Then my son had to help. So he got in on the action by un-separating them and throwing them back into the brush. After a bit, we had a huge pile of naked hickory nuts, and my MIL (mother-in-law shorthand) asked the kids and me what we could do with them.

Now, I have a huge obsession with painting things. I suggested that we paint a few and mix them with the natural colored ones and throw them in a vase and you could use them as fall decoration.


But then I had another thought.

I have seen so many wreaths made from shells and other things, I thought "why not make a wreath out of them"!

She thought it was a good idea, so we collected up the nuts and brought them in.

Here is how the wreath came together:

First, collect up the nuts you want to use, I think we ended up using about 5-6 pounds of them (we collected about 10). Make sure they are relatively clean, you don't have to wash them, but if you want to you can. I didn't wash mine, it was part of the aesthetic.


Then gather your materials. For mine, I used a sturdy, straw wreath form from Joann’s craft store for $2.99, some spray paint (Krylon Colormaster in Satin Nickel and Metallic Silver on this one), something to cover the wreath form since the nuts don't fit together perfectly, and a high temp hot glue gun to secure the nuts to the wreath. I used scrap burlap to wrap the wreath, and found that the cooler temperature glue gun cooled too quickly for this, so hot worked best for me.


After collecting all the materials, I took some nuts asides and separated them for each color I wanted to spray paint. Once dry, I combined them with the unpainted nuts to mix them together.


While waiting for the nuts to dry, I wrapped the wreath with the scrap burlap, using the hot glue to secure.


Now for the really time consuming, possibly dangerous part: glue the nuts to the burlap covered wreath form.


This took me longer than normal because my three year old daughter insisted on helping, so I had to be careful not to get the glue near her or me (Safety first!). You can glue them however you want, I chose to intersperse the painted nuts throughout by not letting the painted nuts touch other painted nuts. Try to make sure that you fit the nuts as closely together as possible so that very little burlap is showing.


I realize it is impossible to do this everywhere, hence the reason for the burlap background.


The next steps are completely optional:

Find some silk flowers and glue to the wreath (I found these at Joann’s on 70% off clearance).

Make a burlap or ribbon hanger. I suck at making bows, so I just tied a knot- I think it adds to the rustic charm.

Now you have a very beautiful and very heavy seasonal wreath. You could also carry the wreath to other holiday seasons by spraying the whole thing (minus the flowers) a metallic, white, or other “holiday” color.


Thanks Paige for that awesome inspiration and tutorial!


Wasn't that super easy for such a big statement?! I'm lazy, as we all know, and would have probably skipped the spray painting and left it all natural and rustic. But all glossy white with some iridescent glitter on it and a silver bow for winter would look super sweet, too! And if you don't have hickory nuts in your backyard, go ahead and gather acorns or anything else for this. But make sure there aren't any holes... you don't want worms coming out!

Thursday, October 24, 2013

Shelf Behind Couch

Due to our strange living room size and shape, to add any seating without losing "kid space" we had to get a corner couch. This corner couch made it nearly impossible to put in end tables. We needed a place to put the remote and cups! Well, anything, besides the floor.


A quick Pinterest search has shown me a very simple "why didn't I think of that" answer.

A shelf.

A simple shelf attached to the wall in line with the back of the couch.

**Face Palm** Of course. Basically, create a sofa table, then there's no need for end tables! At least, not on the side that we can actually put the couch against a wall.

When I bought the wood to make the photo ledges, I bought an extra 6 foot long pieces that's 6 inches wide. I didn't want it to stick out too much, just enough to hold a mug and charge a phone.


I didn't feel like doing the whole painting by hand thing again, so while I was spray painting the sunglasses frame, I spray painted the wood, too. Just the side that shows. I didn't need to do all over. No one would see it, why waste the time and paint?

(The Ikea ones I bought that don't fit. Image from here.)
I also bought the wrong size L brackets. Opps. Definitely keep the width of your wood in mind when picking them out! Luckily, my dad just happened to have a whole much and many different sizes at his disposal. He claims they were on sale and "you never know when you might need one". Ok dad, if you say so.


A simple find the studs, screw brackets to wood, and shelf to wall, and it was done. Really, it was that easy. You could get a bit more fancy and use corbels or fabric wrap the shelf part. Paint a design. Anything, it's yours to play with. Mine's just nice and simple. And because the studs are set in from the edges of the shelf, it kind of looks like it's floating. I find that cool. Maybe I'm weird.


A simple fix to an awkward problem. You definately can customize it as much or as little as you want, but now you know not to let lack of floor space keep you from having a place to set things down!


Wednesday, October 23, 2013

Eucalyptus in the Shower

What a scam. Seriously.

I don't know if I'm doing it wrong, or just didn't get a fresh enough piece, or what.. but it doesn't work.

At least not for us.

I mentioned before about all of us battling head colds and sinus issues. It's school time afterall. And since there's very few medicines out there for the girls to help them fight this, I thought I'd give the eucalyptus in the shower trick a try. I figured it's cheap and pretty, so why not?

Why not? Because it doesn't work!

I put it on the opposite end of the shower like some sites suggested to get it from growing mold and getting mildewy... nothing.


So then I put it directly under the shower head hoping it'll be stronger... nothing. Well, a little if you put your face right up to it while rinsing the soap off.


The lady at the flower shop even said that 1 stem should be enough because "it's very potent". I have a good sniffer, but this isn't potent. Not even a little bit. Not even at all (bonus point if you name that movie).

So let's call this natural remedy busted. Maybe it'll work if the water's super hot and running for a long time, but that's not practical for the us and the girls. It'll stay in the shower until the leaves start to fall (apparently this is toxic to cats) or until it's moldy and mildewy. At least the whole thing only cost me $2.

Any other suggestions besides the OTC stuff and garlic? Poor Snowflake's under that magical 2 years old mark to take anything.

Tuesday, October 22, 2013

Easy Fall Craft for Kids

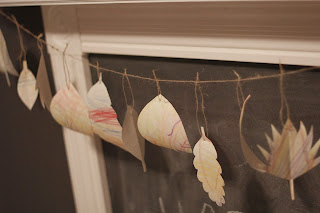
You saw my mantel yesterday, right? Did you see the banner strung up on it?

Didn't pay attention? Ok.. here you go:


Cute, huh? We all made it... together. Even Brian got in on the action.

It's was a fun little quick activity for the girls before bed. After the mantel was up, I looked at it and looked at it and was like "something's missing.. I don't have time to print anything out or.. do I have ribbon... ooohhh wait!"


Yes, that's the conversation I said out loud about 10 minutes before bedtime. Then proceeded to get a random giant piece of paper I happened to have on hand (from figuring out which size window to buy.. I knew it would come in handy one day), laid it on the floor and told the girls to "color it completely".


They wanted us to help, so we all sat around it and colored. It was nice.


Then I cut it in biggish stripes and folded sections in half and roughly cut out leaf-like shapes. There was no real thought process or planning involved. It was blind cutting.

And because I had no ribbon on hand, I pulled some strings from the edge of the burlap table covering. It was already fraying from the cats, I just made it prettier on that side.


Poked holes in the leaves with a small screwdriver (I think it was, it was really weird looking) and strung different length loops of string through it. Let Pumpkin string them all together and taped to new mantel. That's it. Super easy and gives off the right vibe I was going for: Homemade art project.


And it flutters in the breeze like real leaves. I think we'll be doing something similar for every holiday now.


You could do any color or shape really. Trees and stars for Christmas. Snowflakes for winter. Hearts for Valentine's Day. Etc.. Free form the shapes or find a clip art and print them out. But the best part was just doing it together and watching the girls look excited when it got displayed like art on "mommy's new mantel".

Monday, October 21, 2013

Mantel Is Up!

Yes, it is! It's finally up! Up and decorated and functional!

It's sooo exciting!


This wall, right here. Remember that? That big, boring, blank gray wall. No visual interest. Nothing to look at. Nothing but childrens' chairs. I lived with it blank for 3 years and gray and blank for all of summer.


Then we taped up an outline of a mantel to see where the studs were and height we wanted, etc. This covered this wall for 2 weeks. 2 weeks of a taped mantel outline.


Then I got tired of waiting and decided to do the chalkboard paint and let the kids have at it. Why not? At least now it's functional. And something a little bit more to look at.

Then Friday night, 2 nights before the birthday party, the real visual work began...


 Then Saturday night the exciting work began... The actual mantel part was going up!


Isn't my dad awesome? There was a lot of behind the scenes work for this baby to get up. Lots of planning, cutting, sanding, and then I did 2 coats of paint while dad worked on the mantel part which was a lot more cutting and sanding. Then I had to do 2-3 coats of paint on that plus drying time in between.

Phew.. I'm exhausted typing that!

But the final product was completely worth it. Don't you think?


                      Before:                                                                      After:

And my window mirror with burlap wreath fit perfectly up there.. just like I planned!

Friday, October 18, 2013

October 19th

I know, I know. Technically this is the 18th. But since I don't post on the weekends, I figured I would do it for today's....

On October 19, 2009, we welcomed Pumpkin into this world. That was 4 years ago.

Four!

I know everyone says it, and I will say it every year, but where did that time go? I've been a mommy for 4 years. I can't even remember much from before then, either.

My posts this week have been a lot of linking up to other posts because we've all been battling head colds/sinus infections (thank you school!) and trying to get ready for the birthday party. Not much has been getting done. A lot of painting on my part for the pieces of the mantel, and a lot of cleaning, and re-cleaning the same spots... over and over again. Kids.

Yes, painting the mantel.

It's real. It's getting done. And supposedly it will be up and mounted on Saturday! I'm so excited. So the big reveal will be to the birthday party guests, and then sometime next week you all will get to see it, too.

So let's look at adorable pictures of my not-so-little-anymore-big-girl growing up over the past 4 years.

Cue the tears: